Oreo Icebox Cake

Oreo Icebox Cake is the epitome of dessert indulgence – a creamy, dreamy treat that promises to satisfy your sweet cravings without requiring hours of baking. It’s layered with luscious whipped cream and delightful Oreo cookies, making it a no-bake dessert that’s as easy to prepare as it is delicious. The great part? The longer you let it chill, the better it gets! The softening Oreos morph into a cake-like texture that melts in your mouth, giving you a rich, decadent experience.
Table of Contents
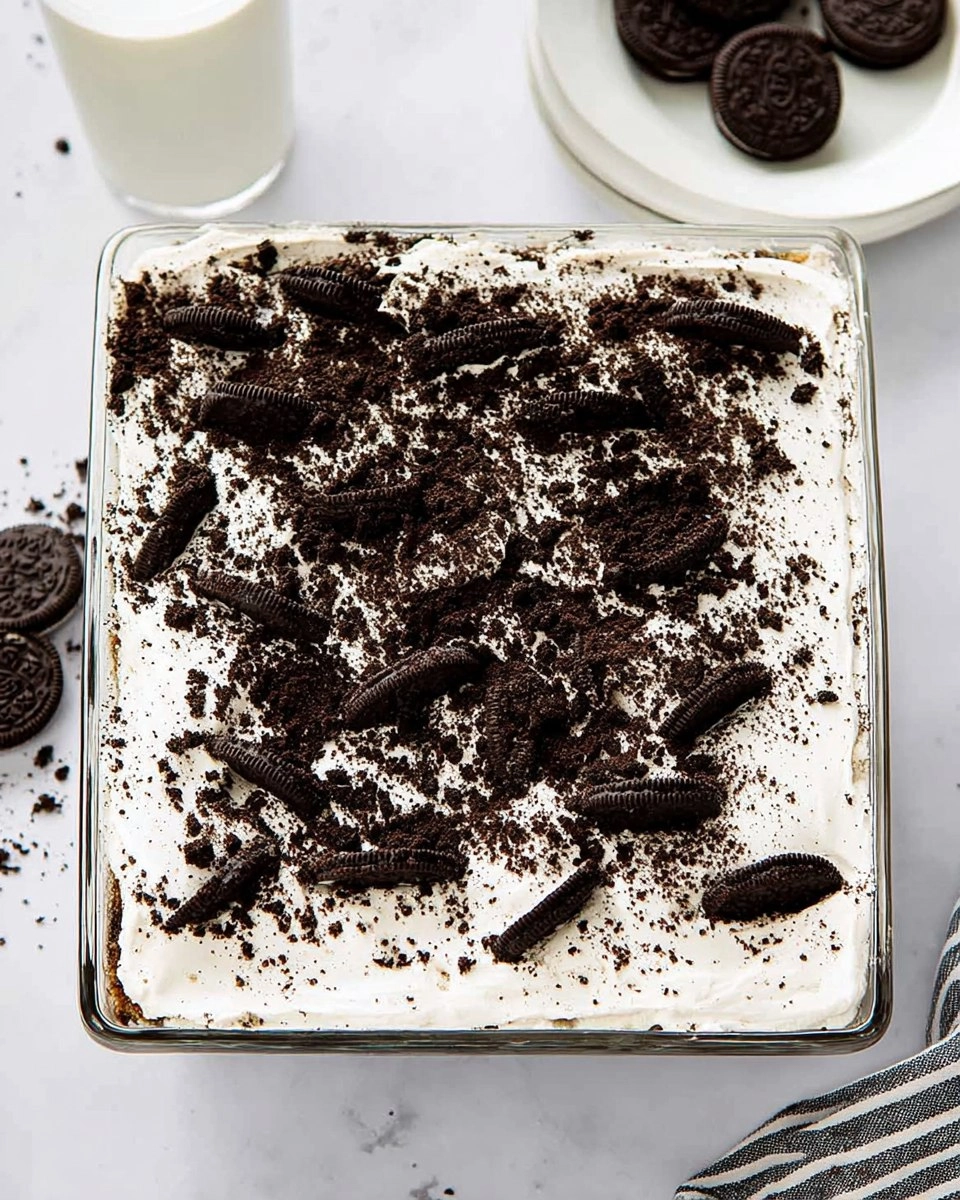
I first stumbled upon this delightful recipe at a summer barbecue, and it quickly became a staple in my dessert repertoire. Friends and family couldn’t get enough of its creamy layers and chocolatey goodness. This Oreo Icebox Cake is a crowd-pleaser that requires minimal effort yet delivers maximum flavor. It’s perfect for gatherings, and the best part is, you can prepare it ahead of time. I’m excited for you to try this simple yet stunning dessert that will leave everyone asking for seconds!
Why You’ll Love This Recipe
- Simple & Quick: In just about 20 minutes of prep, you can whip up a dessert that only gets better with time!
- Irresistible Flavor: The combination of rich cream cheese and airy whipped cream over crunchy Oreos is nothing short of divine.
- Eye-Catching Appeal: With its stunning layers and crushed Oreo topping, this dessert is sure to impress your guests.
- Flexible Serving: Great for any occasion, whether it’s a casual get-together, birthday party, or a midday treat.
- Diet-Friendly Options: Easily adaptable for gluten-free diets with gluten-free Oreos.
Ingredients You’ll Need
- 48 Oreo cookies: These are the star of our dessert! They give a delightful chocolate flavor and a satisfying crunch. Feel free to use the regular version or double-stuff for an extra creamy layer.
- 4 ounces cream cheese, softened: This adds a rich, creamy texture to our whipped mixture. Make sure it’s at room temperature for easy blending.
- 2 ½ cups (595 g) heavy whipping cream, cold: This is essential for achieving that fluffy whipped cream that holds its shape beautifully. Always use heavy cream for the best results.
- ½ cup (62.5 g) confectioners’ sugar: This contributes sweetness and helps stabilize the whipped cream. You can use granulated sugar as an alternative, just keep in mind the texture will be slightly grainier.
- 1 teaspoon vanilla extract: For a hint of warmth and flavor, this ingredient enhances the overall taste. Use pure vanilla for the best results.
- Crushed Oreo cookies: Perfect for garnishing! They add a crunchy texture on top and look gorgeous against the whipped cream.
How to Make Oreo Icebox Cake
- Chill the Mixer: Place the bowl of your stand mixer and whisk attachment in the freezer for 15 to 20 minutes. This will help the cream whip up better.
- Beat the Cream Cheese: In your chilled bowl, beat 4 ounces of softened cream cheese until smooth. It’s important for it to be creamy to combine easily with the other ingredients.
- Prepare the Whipped Cream Mixture: Add 2 ½ cups of cold heavy whipping cream, ½ cup of confectioners’ sugar, and 1 teaspoon of vanilla extract to the bowl. Beat on medium-high speed until stiff peaks form, but don’t overbeat; you want a creamy texture.
- Layer the Bottom: Spread a thin layer of the whipped cream mixture into the bottom of an 8×8-inch baking dish. This acts as the base layer.
- Add the Oreo Layer: Arrange a single layer of Oreo cookies over the whipped cream. Don’t hesitate to break a few cookies to fit them in if needed—you still want it packed!
- Spread More Whipped Cream: Take about one-third of the remaining whipped cream mixture and spread it evenly over the Oreo layer.
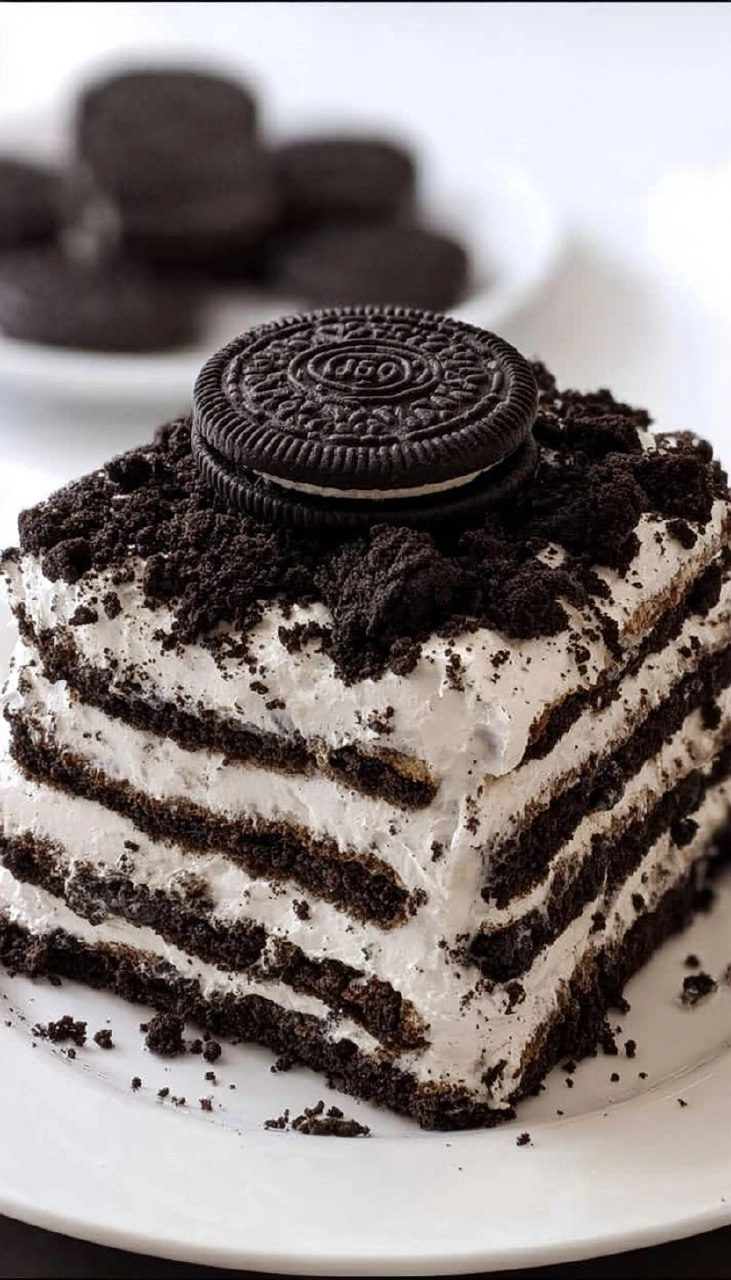
- Repeat the Layers: Continue this process of layering cookies and whipped cream two more times. Aim for three layers of cookies and two layers of whipped cream, finishing with a whipped cream layer on top.
- Garnish: Sprinkle crushed Oreo cookies on the very top of the cake. They add a lovely visual contrast and extra crunch.
- Chill: Cover tightly with plastic wrap and refrigerate for at least 6 to 8 hours or preferably overnight. This is the secret to that soft cake-like texture, as the cookies absorb moisture.
- Serve: When you’re ready to serve, consider placing the cake in the freezer for 20 to 30 minutes before cutting to get the cleanest slices. Enjoy cold!
Storing & Reheating
To store your Oreo Icebox Cake, keep it tightly covered in the refrigerator where it will last for up to 5 days. If you want to keep it longer, you can freeze individual slices in an airtight container for up to 3 months. Just let it thaw in the refrigerator overnight before serving. The texture will change slightly during freezing, but it remains delicious. If you’re reheating—or rather, enjoying it straight from the fridge—just know it’s best served cold and refreshing!
Chef’s Helpful Tips
- Avoid overbeating your whipped cream; it should be fluffy and airy, not grainy.
- For the creamiest texture, ensure your cream cheese is completely softened before mixing.
- Consider layering with different flavors—try adding a layer of peanut butter or chocolate pudding for a twist!
- If your whipped cream seems too loose, beat it for a few more moments—it should hold stiff peaks.
- This dish can be made a day in advance, allowing the flavors to develop beautifully!
There’s something truly special about making and enjoying a dessert that requires minimal effort yet brings so much joy! With its creamy texture and crunchy layers, the Oreo Icebox Cake is sure to become a favorite in your home. Experimenting with layers and fillings can open the door to even more delightful combinations. So, gather your ingredients, invite a friend to help, and get ready to savor every delicious bite!
Recipe FAQs
Can I use low-fat cream cheese in this recipe?
Yes, you can use low-fat cream cheese, but keep in mind that the texture may not be as decadent. Full-fat cream cheese contributes to that rich creaminess that’s a hallmark of an Oreo Icebox Cake.
How long can this cake be made in advance?
This cake is perfect for making ahead! You can prepare it up to two days in advance to let the flavors meld and the cookies soften, making it ideal for parties or busy weeknights.
Can I make this recipe gluten-free?
Absolutely! Just substitute the regular Oreo cookies with gluten-free Oreos. The rest of the ingredients are naturally gluten-free as well.
What if I don’t have a stand mixer?
No problem! A hand mixer will do the trick as well. Just ensure the bowls you use are deep enough to contain any splatters while mixing. Alternatively, you can whisk by hand, but it may take a bit longer.
PrintMore Desserts & Appetizers Recipes
- Street Corn Queso
- Blackberry Pie
- Blueberry Lemon Icebox Cake
- Antipasto Pasta Salad
- Green Goddess Dressing
Did You Enjoy Making This Recipe? Please rate this recipe with ⭐⭐⭐⭐⭐ or leave a comment.
📖 Recipe Card
Oreo Icebox Cake
- Prep Time: 15 minutes
- Cook Time: no bake
- Total Time: 0 hours
- Yield: 9 servings 1x
- Category: Desserts
- Method: No-bake
- Cuisine: American
Description
This Oreo Icebox Cake is a delightful no-bake dessert that features layers of creamy whipped filling mixed with Oreo cookies. With simple prep and refreshing taste, it’s ideal for gatherings or a sweet treat at home.
Ingredients
- 48 oreo cookies
- 4 ounces cream cheese, softened
- 2 ½ cups (595 g) heavy whipping cream, cold
- ½ cup (62.5 g) confectioners' sugar
- 1 teaspoon vanilla extract
- 1 cup crushed Oreo cookies
Instructions
- Chill the bowl of a stand mixer and the whisk attachment in the freezer for 15 to 20 minutes.
- In the chilled bowl, beat the cream cheese until smooth. Add the heavy whipping cream, confectioners’ sugar, and vanilla extract, then beat on medium-high speed until stiff peaks form, being careful not to overbeat.
- Spread a thin layer of the whipped cream mixture into the bottom of an 8×8-inch baking dish.
- Arrange a single layer of Oreo cookies over the whipped cream, breaking some as needed to fit.
- Spread about one-third of the remaining whipped cream mixture evenly over the cookies.
- Repeat the layers two more times, finishing with a final layer of whipped cream on top.
- Sprinkle the top with crushed Oreo cookies.
- Cover tightly and refrigerate for at least 6 to 8 hours, or overnight to allow cookies to soften.
- Serve cold; for clean slices, freeze for 20 to 30 minutes before cutting.
Notes
For a richer flavor, use full-fat cream cheese instead of reduced-fat.
You can substitute other cookies for different flavor profiles.
Keep leftovers covered in the fridge for up to four days.
Nutrition
- Serving Size: 1 slice
- Calories: 350
- Sugar: 18g
- Sodium: 200mg
- Fat: 26g
- Saturated Fat: 15g
- Unsaturated Fat: 11g
- Trans Fat: 0g
- Carbohydrates: 32g
- Fiber: 1g
- Protein: 4g
- Cholesterol: 40mg